Welcome

Welcome to the new Creatorme blog. This is the new home of the Creatorme.com site.

Sunday, July 7, 2013

Making Your Own Ring Light

When my daughter, who has her own blog about makeup and fashion, told me that she wanted a ring light, I checked into it.  What is a ring light anyway?  Turned out that to get the best picture for the face of a model (see below), a ring light is placed in front of a camera to provide a uniform illumination.  It also causes a ring relection in the model's eye further creating the "cool" look.
Typically, a ring light cost a few hundred dollars.  Being a person who like to come up with alternative inexpensive solutions, I thought about building my own ring light.  I remembered that in the electronics lab, we have bench lights with a magnifying glass in the middle and a ring florescent light for illumination.  So, off to the local Lowes store I went.

Turned out that there are existing rather inexpensive light fixtures that one can buy for around $30 that uses the circular florescent bulbs.  The one I chose to use is the 14" Low Profile Round overhead fixture made by Lithonia Lighting.
When I opened up the box, I found all the pieces I needed (and some extras things that I might end up using for other projects).The key pieces I needed are the 12" circular floresent bulb, the bulb holder and the florescent bulb power supply.

The bulb holder is not open in the middle.  As a matter of fact, the power supply is attached to the middle of the buld holder plate (see below left).  So, the first thing is to remove the power supply and get the plate marked and ready to have the center removed (see below right).  The idea is to remove enough of the plate so that the camera can peek through the center but leave enough material to leave the holder clips for the 12" bulb intact.
I used a pair of sheet metal shear to remove the center of the bulb holder.  It took a little effort but can be easily done if you take your time and remove small pieces of the sheet metal at a time.  Below is the result of the cut.  For convenience, I removed the clips before the cutting.

After preparing bulb holder plate, I drilled some extra holes to mount the power supply to the one side of the holder and to secure the wiring.

I used an L-bracket to attach to the holder to provide a means of attaching the ring light assembly to a tripod.  To provide a stable way to attach the L-bracket and the power supply, a stack of washers were used as spacers to provide seperation between the different assemblies.

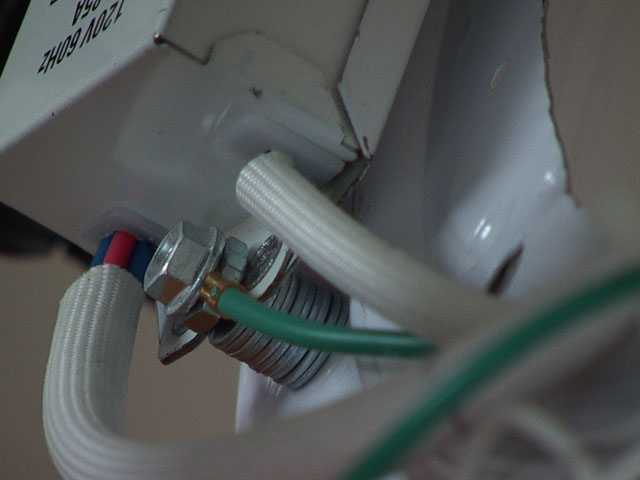
Below is a view of the finished ring from the rear and a picture of the finished ring light from the front.  More work can be done to secure the wires and to provide a more finished look.  I will get to that later.

For more results of how a model looks like when illumintated by a ring light be sure to check out my daughter's blog at:  http://modeyourlife.blogspot.com/.

She is a talented make up and design artist.  You might learn something from the artistic side of things after looking at all these techy stuff.  Enjoy!

Fruit Tree Grafting 2013 - Apple scion to a Pear tree

In my earlier Fruit Tree Grafting 2009 round 1 post, I talked about cross grafting between apple and pear trees.  Although the weather was great in 2009 and all the normal grafts were sucessful, none of the cross grafts took.
This year I tried grafting a Golden Delicious scion to my pear tree.  I did that in the March time frame while everything is still quite dormant.  This is how the graft looks like on 4/27 when the weather started to turn warm and the pear tree blossoms started to develop.
By 5/5, the Golden Delicious scion started to spout along with the rest of the pear tree.
And then, by early July, the leaves are out and the cross grafting of an apple scion to the pear tree was finally sucessful!!!
This graft was done with a single slant splice tied with the normal green grafting tape. I actually removed the grafting tape a couple of weeks ago to inspect the joint and all looked well.  I put the tape back on in case the growth is still not strong enough.  I will remove the tape by late summer or early fall.

Sunday, October 24, 2010

Simple Seed Holder

It’s autumn, and you have harvested all the fruits and vegetables.  If you are into starting you own plants in the spring, you will want to keep some of the seeds from the fall harvest.

I have started to do some of that and was looking for a way to store the seeds.  I didn’t want to put the seeds in a plastic sandwich bag since some of the seeds were still kind of fresh and moist. I wanted to package them so that they could dry up and keep till next spring. I needed to label the packages so I could tell what was what. I have different types of peppers, tomatoes and melons.  It would be good to differentiate between the hot peppers that I grow less of to the different colored bell peppers.

Saturday, October 23, 2010

Rice Filled Sock - your personal warmer


Remember those rubber hot water bottles that you might have used for soothing that cramped muscle or to warm up the bed on a cold winter’s night? Maybe you are too young to have that experience.  My daughter made a rice filled sock that does a much better job than the old water bottle.  She learned it from her friend .  The sock can be painted with a Sharpie pen and can be made into a very attractive companion (see above picture).

Look for an old sock and fill it with rice.  You can use any old sock that is still in good shape (no holes).  It can be any type of sock.  This a good opportunity to use up the pile of socks that you have been keeping while you were hoping that its companion would show up some day. : )   Of course you can also use a pair of socks to make a “twin” set of warmers.

Thursday, October 21, 2010

Overall Grafting 2009 was a Success


It’s been a while since I did all those grafts in spring of 2009.  It is now Fall of 2010.  The scions that took had a full two seasons to grow.  Most of the scions took except for the experimental grafts.

The ones that failed were the cross genus grafts between the apples and pears.  Although I had one success before grafting an apple scion to a pear tree, I was not able to repeat that.  Also, except for the branch shown above, all the cherry grafts did not take.  While not having more cherry grafts take is a disappointment, it was not a big surprise.   Most of the branches I got from my friend Dave were mature branches.  Most of them had

Thursday, October 14, 2010

One Simple Way to Conserve Water


Generally, it is advicable to run the tap a little bit before drinking the water off a tap, especially if the tap had not been used overnight.  Also, one might just want to run the water till it is cold for drinking or warm for washing hands.  Lots of water can be wasted.  Why not collect the water to use for other purposes in the house.  The water can be used for washing dishes or watering plants.

One easy way to do it is to wash and save a gallon milk or cider jug.  Keep the jug near a faucet so that water can be collected instead of letting it go down the drain.  In our house we collect about a gallon of water every few days.  This is just about enough to water the potted plants inside the house.

Monday, August 17, 2009

Fruit Tree Grafting 2009 Round 2


My friend Dave got me some fresh cherry branches from his sister’s cherry trees a couple of weeks ago.  When I got the branches, the temperature started to climb into the 50s and even 60s.  I was getting worried and wanted to get the branches grafted as soon as I can.  I did not want to repeat what happened last year where the leaves all came out suddenly and ruin my grafting opportunity.  We had a rainy Saturday but Sunday turned out to be great so I went out and did as many grafts as I can.

Monday, April 6, 2009

Make Your Own Picture Book

(Posted for bleung)

With the rapid technological advancement of digital photography and on-demand digital printing, why not explore the possibility of creating your own hardcover picture book.  There are many places on the internet that you can create and order the picture books.  With very heavy competition, the prices are very affordable and it provides an opportunity for everyone to produce and publish your own customized picture book at a quantity of one.

Friday, March 20, 2009

Fruit Tree Grafting 2009 Round 1


After the total grafting failure in 2008, it is time to try again.  This is very early in Spring.  But the temperature had been in the 50s and 60s already.  The daffodils came up and is blooming.  I can see that some of the fruit tree flower buds are showing signs of opening up.  Temperature next week will be around 40 to 50 degrees with night temperature in the 30s.  Best time to graft is when the day time temperature is in the 50s and night temperature are in the 30s.  This will give the scions a chance to develop in the day time while the process slows down at night to give more time for the scion to be taken.

Wednesday, March 4, 2009

Making a Chopstick Holder


Rather than just throwing away the chopstick wrapper, here is an idea to turn it into something useful. It is also a great conversation piece and might gain you some points from your date or companions at the dinner table. Folding this chopstick holder should take less than a minute once you give it a practice or two.

Friday, August 8, 2008

Change the Orientation of Your Rubber Gloves


For some reason, my right hand rubber gloves always seem to be the first that develop a leak. Being a right handed person, I guess that I must use my right hand a lot more. I even tried to balance the use of my hands as an experiment to see if I can get the two sides to wear out at the same rate but that did not produce any improvement. The right one always go first. Being a person with conservation in mind, I kept the good gloves when I switch to a new pair. Guess it would be cool if you have a partner that is a left handed person that you can swap with. Unfortunately, we are both right-handed.  Our left hand collection of rubber gloves became so large that I was given an ultimatum to go do something about it or else all my saved gloves go to be recycled.

In desperation, I looked at the box of gloves and an interesting idea came to me. What if I flipped a glove over? Don’t I get a right hand glove then. Well, it worked. The left hand glove turned into a right hand glove. Now I have a box full of semi new gloves to use. Problem solved!!!

Friday, July 18, 2008

Running Shoes Repair


Ever since I was young, I’ve noticed that the heels of my shoes wear out much faster than the other parts. They always wear out at the same spot, and I’ve found that I am not alone. It seems that many people have the same problem. The location may be different for each person, but there is always that one spot that is worn out before the rest of the shoes.

Thursday, July 17, 2008

Make Your Own Chinese Laterns


When we were growing up in Macao, my grandfather used to buy each of us a lantern for the Mid-Autumn festival. There were lanterns in the shapes of different fruits and animals. I’m not sure if people still make make and sell lanterns like that in Macao today. Here in the US, my friend Wai and I came up with a way to make lanterns for our kids. It is a lot of fun; we get the kids involved, and we make some pretty nice looking lanterns every year.

Wednesday, July 16, 2008

Spicy Cucumber Chicken Salad


The Spicy Cucumber Chicken Salad is a good dish to have on a hot summer day - or any other time when you don’t want to do a lot of cooking but still want to eat a healthy, tasty dish. This is also one of our favourite things to bring to parties.

Sunday, June 15, 2008

Upgrade Your Fruit Tree


If you have fruit trees but never get the quality of fruit that you can buy from the market, maybe you should use grafting to upgrade your fruit trees. I had always thought that the reason why the apples and cherries from my tress were sour and small was because I did not fertilize them enough. I tried fertilizing, watering and tending to them obsessively, but I still didn’t get much improvement.

Then I found out from a friend about grafting. He lives in northern California and has a small backyard, but was able to bring us different varieties of high quality fruits. It turns out that he started grafting different fruit trees about 15 years ago and has collected many different types of fruit, many of them exotic. It helps that he is a volunteer for a plant preservation society in Stanford. He can readily get scions (branches for grafting) of all types.

Monday, May 12, 2008

Protector for Your MP3 Player


Why are these ear buds plugged into the Altoids box? Well it turns out that said Altoids box is just the right size to become a protector for the Sansa e200R Rhapsody MP3 player.

It all started when my daughter had a cracked screen on her MP3 player. She likes to carry the player around anywhere she goes. Who doesn’t, right? Well, she is generally very careful about not carrying any sharp objects in the same pocket as the MP3 player. But between the tight jeans and probably the ear buds, what happened was probably inevitable.

Sunday, May 11, 2008

Water-proof Purse from Recycled Plastic Grocery Bags

Preservation of the environment is on everybody’s mind these days. With a little bit of work, one can create different attractive and practical items out of plastic bags. The plastic bags are cut and strung together to make strong and colorful “yarns”.

These are crocheted into bags, mats, and many other things. It seems that these plastic strips can be very strong, water resistant, and can form very interesting color patterns just as you can do with other yarn.

Here is an example of the kind of purse that can be created.

Friday, May 9, 2008

Pebble Bugs


With a little bit of imagination and a set of Sharpie markers, one can turn a simple pebble into a colourful bug. The key is to pick a pebble with the right shape and size. Wash the pebble of any dirt and mud and dry it well. Then colour as desired. Permanent markers such as Sharpie work the best. The white areas for the eyes can be painted on with “White Out” solution. “White Out” is best to use since it dries quickly and is water resistant so other colours can be applied on top of it. However, smaller children should be careful when using “White Out”.
Here is an example of a couple of bugs that can be made. The one on the left is a simple bug with minimum colour applied. The right is covered with brighter colours. For older kids, it would be good to get some pictures of actual bugs and colour the pebbles to make them look like the bugs in the picture. It is also possible to make a family of bugs all with the same colours and/or design. One can also develop some signature colour schemes to generate unique species of bugs.
To get started you can find all the materials at any crafts store. The materials are not really special. The pebbles should be about 1 inch long in size and oblong in shape. Making Pebble Bugs can be a good activity for birthday parties and get-togethers with many children. Painting the pebbles keeps the kids entertained and at the same time allows them to express their creativity.